Showing posts with label hirst arts. Show all posts

Wednesday, January 8, 2014

Hirst Arts: Dungeon Building Molds


My late Christmas present was waiting for me when I arrived home from work today.  25 more Hirst Arts molds, for building dungeon and tabletop-gaming scenery out of plaster blocks.

We already have 20 Hirst Arts molds, plus several custom molds we built to speed dungeon construction.  This gives us a total of 45 Hirst Arts molds.  Now we will need to wait until spring to get some use out of these, as it is too cold outside for the plaster to properly set, and I'm not mixing plaster inside where it will make a mess of the flooring.

Friday, January 4, 2013

More Hirst Arts Builds


Still working on more Hirst Arts dungeon tiles.  This set of four 10' x 10' sections (3" x 3" square) feature the 2" arches from Hirst Arts Mold 44, a mold I only recently purchased.
 
My biggest challenge so far has been getting the room and hallway corners to fit the way I want them to.  These are not bad, though i'm not entirely satisfied with the results.


Even though I spent signficant time during the summer casting more plaster pieces, I am quickly running out of the arches and pillars.  I guess that means making even more custom rubber molds of arches and pillars this coming springtime.

Friday, December 28, 2012

Gothic Panels For Hirst Arts Dungeons

Here are some of my favorite Gothic decorated plates from Scibor Miniatures,


I'm intending to place an order with Scibor in the next couple of days, as i've got some paypal money that is just crying out to be spent.

The above pieces should make quite an impact on the look of my Hirst Arts dungeon.

Any recommendations on other manufacturers of interesting gothic wall accessory pieces?

Wednesday, December 26, 2012

A Hirst Arts Christmas

I can't possibly complete with others who deliver a more compelling Merry Christmas message: the angel of death is a poor substitute for the christmas angel. 


Still, these images represent some amazing Hirst Arts dungeon porn.  Full disclosure, i`m not responsible for the following dungeon pieces, nor the accompanying embellishments.


You can find the embellishments here, at Scibor Miniatures, and the forum thread at the Hirst Arts site, both of which you will find quite inspiring, if only from a Hirst Arts construction standpoint.


Sunday, November 25, 2012

Hirst Arts Walls


In original Dungeons and Dragons, Dwarves have the ability to note new construction in underground settings.  That OD&D Dwarven ability heavily informs my approach to Hirst Arts dungeon tile construction:  I am building tiles that feature different construction styles, depending on who built the particular dungeon area, and during what epochs they were built.

Hirst Arts provides a plethora of options, including gothic, fieldstone, egyptian, and other themed construction molds.  Even within those broad classifications, there are varied pillars and block sizes and shapes around which different construction styles can be aggregated.


I've been spending much of my limited spare time building wall sections.  I have plenty of floor sections.  The wall sections tend to be more complicated, with more pieces, so it has been a drawn-out process building them, not to mention that the related construction elements are more detailed and less common on the molds than those for floors.


Almost all of the currently buit walls have been built with gothic elements.  Because there are two different sizes of doors, door arches have to come in two different sizes, thus explaining the two photos above.  One doorway is peaked, the other is arched.


All of my floor tiles are built in 3"x 3" sections.  In order to create corner sections, I have sandpapered the edges of the walls where they connect at the corner.  Dental plaster is a pretty hardy material, so this takes some time.  I recommend wearing a filter mask while you are sandpapering, as you generate significant amounts of plaster dust.


There are several different sizes of wall bricks.  The above photo shows a "bricked-up" door arch, representing those door arches that have been bricked-up, to prevent access to the area beyond, or prevent whatever is behind the door from getting out.

Thursday, October 11, 2012

Hirst Arts: Pairs of Stairs


I have a small box of Hirst Arts stair elements, so I decided to build a couple of 10' sections of dungeon stairs. 

The front-most staircase is made from Hirst Arts chipped stone stair elements, while the staircase in the rear is built from the smooth, marble elements.  The stairs descend at a 45 degree angle. 

You'd need to put three of these staircases together to repesent your typical 30' staircase, found in many dungeon designs.  Suddenly a 30' staircase seems awfully imposing!

Wednesday, October 10, 2012

Hirst Arts: Platform


I'm still playing around with the Hirst Arts construction elements.  Here is a raised platform, with two sets of stairs on either side.  With so many elements at my disposal, I am trying to find ways of using up all of the excess pieces. 

The platform comes apart in four sections, and each is 3" x 3", which is my favored scale for 10' x 10' dungeon tiles.  Using a scale of 1" = 3'4" allows for walls on the section, while still permitting two miniatures abreast on your typical hallway.

Sunday, September 23, 2012

More Hirst Arts Scenery

With the summer winding down, and autumn arriving, we come to the end of the Hirst Arts casting season in Canada.  Good weather is required for plaster casting, as the heat is needed for the plaster to set up.  It gets too cold in the autumn and winter to do much casting.


Most of the Hirst Arts molds have been put away, as well as the plaster and the related paraphernalia.  A couple of days have already been spent on scenery building.  The above columned chamber will serve as a "throne room of the gods" in an on-going campaign.

The second piece of Hirst Arts scenery is a traveller's bridge, useful as a choke point over a raging river.  This will be brought to bear once we return to our Lord Of the Rings tabletop battle games.


I've got my eye on a couple of additional Hirst Arts molds, but there's no hurry buying them, since I won't be getting back to casting until next summer.  Hopefully the Canadian Dollar continues to ride high, making the molds more economical to purchase.

Sunday, September 18, 2011

Hirst Arts: Wooden Doors


Here's a photo of some painted Hirst Arts wooden doors. I'm not entirely happy with the wood. Next time i'll go for something with a little more red. I was experimenting with the metallics, trying out the bronze and iron looks.

I'm going to build some wall sections next, and play around with the look of those.

Tuesday, August 23, 2011

Hirst Arts - Making Your Own Dungeon Tiles

One of the more enjoyable facets of building your own dungeon tiles is creating additional molds to add your own unique pieces, as well as speed construction. At the beginning, it is smartest to restrict yourself to using the molds available from Hirst Arts, but at some point you may want to branch out and customize your dungeon tiles.

Bruce Hirst encourages people to do so, while observing that creating original molds is an exacting process. So far, my mold making efforts have been confined to creating molds to speed construction.

Here is an example. I created this mold to assist in the production of my floor tiles. It yields 14 half-by-one inch edged blocks, and 7 half-by-half corner blocks.


To produce this, I needed to make a master (the original blocks are glued to this piece of 5" x 8" glass.


You'll need a frame, in order to pour the silicone over the master and keep the silicone from running off the sides. In this case, I raided the lego collection of my son and made this 4" x 6" frame.


You'll also need some silicone. As far as I can tell, this Mold Max 40 is the same silicone that Bruce Hirst uses for his Hirst Arts molds, and it sets up fairly quickly.


The goal is to produce more of the floor tiles pictured below. While I have a glut of the one-inch centre blocks, I have very few of the edge pieces, thus necessitating my mold-making effort above.


Wednesday, August 3, 2011

Hirst Arts - Cobblestone Floors

There's an old saying: make hay while the sun shines. With only 4 months of the year available for casting here in Calgary, i'm spending as much time as possible pouring plaster to make more Hirst Arts elements. Here are more fruits of my labours. Several 3" x 3" cobblestone floor tiles.
Some of the tiles have straight edges, while others have a wavy edge. The wavy edge permits the tiles to be placed along side each other, while minimizing the seam between the tiles.

These are my "master" tiles. Using these, I will create new molds to speed up the floor tile casting process.

I still need to get working on my wall tiles. Once I have produced a couple, I will post them.

Friday, July 22, 2011

Hirst Arts Elements Part III

My first Hirst Arts elements post was dominated by doors. This post features pillars.Here we have a corner pillar, a crate with a removable lid, a keg and a pillar section.
Here are two additional pillar sections, a plain pillar and a 3/4 corner pillar.
The top corner pillar has some interesting runes on the edges. There is also an alcove pillar, a pillar with a hooded figure, and a tubular pillar in the bottom corner.
Here are some other interesting elements, including another crate, various sacks of grain, a crystal ball and a lion's face.
Finally, we have a pile of coins, a broken barrel and pail, a pile of bones, and a campfire with flames.

Thursday, July 21, 2011

Hirst Arts Elements Part II - Altars

I promised I would post a couple of pictures of painted Hirst Arts elements. Here are a couple of altars that I built and painted. These were my first efforts at building and painting.
The great thing about the Hirst Arts elements is that the configurations are endless. Here is a 1 1/2" x 1/2" altar, painted brown. The corners, edges and centre blocks are separate pieces and in 1/4" sections, so you can make something as small as 1/2" x 1/2", or as large as you want.
Here are two 1" x 1/2" altars painted blue and white. I laid the white on too heavily, but it's easy to build new ones, or repaint these.
My favorite altar of the three, and i'm sorry that the picture is so grainy. This 1 1/2" x 1" red altar will be perfect for an evil shrine or the sacrificial altar for a death cult.

Tuesday, July 19, 2011

Hirst Arts Elements Part I

Here are photos of 15 of the roughly 120 Hirst Arts elements that I have available to me. Sorry for the quality of the photos, I was shooting these with my iPod, which has terrible resolution. I have painted very few elements, but I will post a couple that have been painted tomorrow. This first set of photos includes a bench or temple pew, a treasure chest, a wooden door, and a door to a prison cell. This second set of photos includes a brazier with flames atop it, a stone door, a steel door, and a gate. Here we have a series of photos that include a crate, an empty barrel, an urn, and a small pool.
Finally, we have a peaked door, a large metal-bound and locked door, and a basin.

Monday, July 18, 2011

Hirst Arts Elements: Casting Time Of Zero

One of the questions posed to me the other day, about casting Hirst Arts molds, relates to the required time for casting the plaster elements. Sadly, the casting time for Hirst Arts is NOT zero.

However, with a little planning, you can complete one mold every six minutes.
Here's a series of photos showing the Hirst Arts casting process. In addition to the Hirst Arts molds (in green, plus one of my own molds in pink) you will need some plastic cups, water for mixing with the plaster (in the Indiana Jones popcorn bucket) and a soaking tub for your molds, complete with jet dry mixed in to the water, to break the water tension in the soaker. Obviously, you'll need some plaster. I recommend dental plaster...this is a 50 lb box of the stuff. You'll also need some paper towels and spoons.
The white molds are mine. The larger stack of green molds are more Hirst Arts molds, and next to them are four 5" and 6" drywall knives, used to scrape the top of the molds to make all of the blocks and elements level and the same size. Sometimes we have all four drywall knives going, which means more molds being cast.
This is the demolding table, with two bits cabinets that hold 60 drawers each. On the table are several Hirst Arts casting elements that have recently been removed from their molds. Paper towel has been placed on the table, to protect the table from scratches and assist in drawing out any excess moisture that may be in the elements as they are being removed from the molds.
Here's the other end of the demolding table. I use old plastic berry containers to hold some of the larger or more frequently cast plaster elements. The smaller or less frequently cast elements are placed in the bits cabinets.
I have a lot of plaster elements previously cast and waiting to be brought together. Here are more berry and ziplock containers holding additional plaster bits.
The casting table is set up at the entrance to the garage. The pictured molds have been pre-soaked in the jet dry tub (the jet dry tends to break up the bubbles that form in the plaster and helps the plaster to flow into all the crevices of the molds) and are resting on paper towels that will soak up any excess moisture and unused plaster. The table has been covered with a black garbage bag to prevent stratches from the plaster and make cleanup easier. I get a lot of neighbourhood traffic dropping by to see what i'm doing, which gives me the opportunity to catch up on the latest gossip while i'm casting.
I half-fill the plastic cup with water. I know there is a specific ratio, but i'm too lazy to measure the water and plaster precisely, and this process is pretty old-hat now so I go mostly on feel.
I slowly add the plaster to the water until the cup is nearly full, usually only a 1/2 inch from the rim, and the plaster no longer absorbs into the water.
Here's the final product, after some vigorous stirring with a spoon, plus a little plaster on my hands.
The plaster mixture should be thick enough that it has the consistency of a thin milkshake.
Now it's time to pour. Some people spoon the mixture into the molds, but again, LAZY, I just pour the plaster directly from the cup. A little bit of splashing, but not bad. As you can see, on the right, the first mold is poured, and bubbles are starting to form on top, when trapped air has risen to the surface.
Nearly done the pour on the second mold.
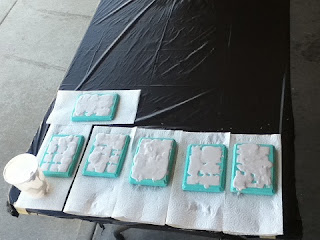
And here are the first set of six molds, poured. The next step is vibrating the molds, so that any unreleased air bubbles can be released. I'll try to get to the next steps in a day or so.