Sunday, July 31, 2011
Canadiana: Bryan Adams
Bryan Adams "made it big" in the US, based on some of his sappier romantic ballads, but his earlier work is far better.
Tuesday, July 26, 2011
Vacation -- Day Three
 What with our internet access being unpredictably intermittent, this post is a little late. Yesterday morning began with more sourdough waffles (we've been promised them as long as they are in demand) fresh strawberries and ice cream.
 Then out for our morning constitutional, snapping photos along the way. We came across a couple of blackberry canes, with the first hints of blackberries growing on the tips.
  We also came across a wild apple tree, with the branches groaning under the weight of its apples.
 Down to the beach after lunch, for a swim. Following the swim we drove into Sicamous, a town 6 miles from the cabin, to buy more strawberries, fill up the gas tank, and buy a couple of ice creams at the local ice cream shoppe, D Dutchmen Dairy.
 The kids had bubblegum, chocolate silk and strawberry wafflecones. The adults picked up two gallon pails of ice cream, one, chocolate raspberry swirl, the other, cherry custard.
 After dinner, we played an 8-player game of Settlers of Catan. Though I was not in the running for the title of victor, others did worse. It was a fun game, with lots of drama and betrayal.
Sunday, July 24, 2011
Vacation -- Day Two

Normally you start your vacation posts with day one, but yesterday was an adventure to say the least. A couple of hours before we left for vacation, there was a massive mudslide on the highway between Calgary and our cabin. The detour added 55 miles and four hours to our roadtrip. A roadtrip that should have taken us six hours ended up taking ten.
 Everyone was in the same situation, as you can see from the photo of the traffic that was in front of us. Now imagine that the stalled traffic stretches for another 20 miles beyond the range of my camera.
 Homemade waffles with fresh fruit and ice cream this morning make up for a miserable roadtrip.
 That, and lakeside views like this. Today we went for a long walk on the property, visited with some family, did a huge grocery run, and enjoyed a hot tub.
 Tomorrow: day three.
Friday, July 22, 2011
Hirst Arts Elements Part III
My first Hirst Arts elements post was dominated by doors. This post features pillars. Here we have a corner pillar, a crate with a removable lid, a keg and a pillar section.
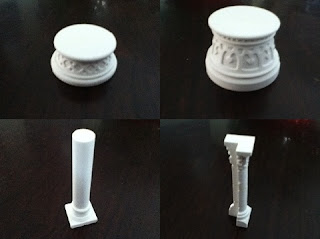 Here are two additional pillar sections, a plain pillar and a 3/4 corner pillar.
 The top corner pillar has some interesting runes on the edges. There is also an alcove pillar, a pillar with a hooded figure, and a tubular pillar in the bottom corner.
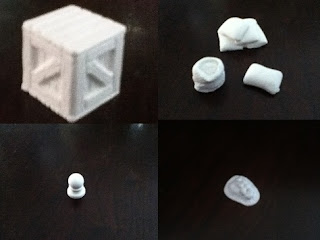 Here are some other interesting elements, including another crate, various sacks of grain, a crystal ball and a lion's face.
 Finally, we have a pile of coins, a broken barrel and pail, a pile of bones, and a campfire with flames.
 Here we have a corner pillar, a crate with a removable lid, a keg and a pillar section.
 Here are two additional pillar sections, a plain pillar and a 3/4 corner pillar.
 The top corner pillar has some interesting runes on the edges. There is also an alcove pillar, a pillar with a hooded figure, and a tubular pillar in the bottom corner.
 Here are some other interesting elements, including another crate, various sacks of grain, a crystal ball and a lion's face.
 Finally, we have a pile of coins, a broken barrel and pail, a pile of bones, and a campfire with flames.
Thursday, July 21, 2011
Hirst Arts Elements Part II - Altars
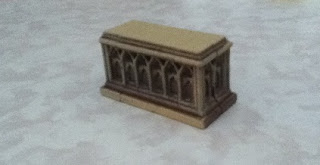
I promised I would post a couple of pictures of painted Hirst Arts elements. Here are a couple of altars that I built and painted. These were my first efforts at building and painting.
 The great thing about the Hirst Arts elements is that the configurations are endless. Here is a 1 1/2" x 1/2" altar, painted brown. The corners, edges and centre blocks are separate pieces and in 1/4" sections, so you can make something as small as 1/2" x 1/2", or as large as you want.
 Here are two 1" x 1/2" altars painted blue and white. I laid the white on too heavily, but it's easy to build new ones, or repaint these.
 My favorite altar of the three, and i'm sorry that the picture is so grainy. This 1 1/2" x 1" red altar will be perfect for an evil shrine or the sacrificial altar for a death cult.
Tuesday, July 19, 2011
Hirst Arts Elements Part I
Here are photos of 15 of the roughly 120 Hirst Arts elements that I have available to me. Sorry for the quality of the photos, I was shooting these with my iPod, which has terrible resolution. I have painted very few elements, but I will post a couple that have been painted tomorrow.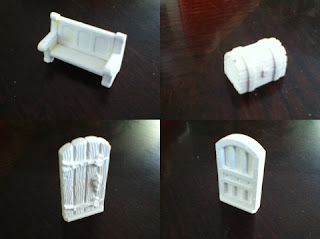 This first set of photos includes a bench or temple pew, a treasure chest, a wooden door, and a door to a prison cell.
 This second set of photos includes a brazier with flames atop it, a stone door, a steel door, and a gate.
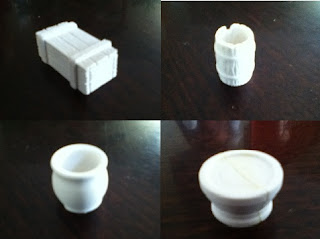 Here we have a series of photos that include a crate, an empty barrel, an urn, and a small pool.
 Finally, we have a peaked door, a large metal-bound and locked door, and a basin.
 This first set of photos includes a bench or temple pew, a treasure chest, a wooden door, and a door to a prison cell.
 This second set of photos includes a brazier with flames atop it, a stone door, a steel door, and a gate.
 Here we have a series of photos that include a crate, an empty barrel, an urn, and a small pool.
 Finally, we have a peaked door, a large metal-bound and locked door, and a basin.
Monday, July 18, 2011
Hirst Arts Elements: Casting Time Of Zero
One of the questions posed to me the other day, about casting Hirst Arts molds, relates to the required time for casting the plaster elements. Sadly, the casting time for Hirst Arts is NOT zero.
However, with a little planning, you can complete one mold every six minutes.
 Here's a series of photos showing the Hirst Arts casting process. In addition to the Hirst Arts molds (in green, plus one of my own molds in pink) you will need some plastic cups, water for mixing with the plaster (in the Indiana Jones popcorn bucket) and a soaking tub for your molds, complete with jet dry mixed in to the water, to break the water tension in the soaker.
 Obviously, you'll need some plaster. I recommend dental plaster...this is a 50 lb box of the stuff. You'll also need some paper towels and spoons.
 The white molds are mine. The larger stack of green molds are more Hirst Arts molds, and next to them are four 5" and 6" drywall knives, used to scrape the top of the molds to make all of the blocks and elements level and the same size. Sometimes we have all four drywall knives going, which means more molds being cast.
 This is the demolding table, with two bits cabinets that hold 60 drawers each. On the table are several Hirst Arts casting elements that have recently been removed from their molds. Paper towel has been placed on the table, to protect the table from scratches and assist in drawing out any excess moisture that may be in the elements as they are being removed from the molds.
 Here's the other end of the demolding table. I use old plastic berry containers to hold some of the larger or more frequently cast plaster elements. The smaller or less frequently cast elements are placed in the bits cabinets.
 I have a lot of plaster elements previously cast and waiting to be brought together. Here are more berry and ziplock containers holding additional plaster bits.
 The casting table is set up at the entrance to the garage. The pictured molds have been pre-soaked in the jet dry tub (the jet dry tends to break up the bubbles that form in the plaster and helps the plaster to flow into all the crevices of the molds) and are resting on paper towels that will soak up any excess moisture and unused plaster. The table has been covered with a black garbage bag to prevent stratches from the plaster and make cleanup easier. I get a lot of neighbourhood traffic dropping by to see what i'm doing, which gives me the opportunity to catch up on the latest gossip while i'm casting.
 I half-fill the plastic cup with water. I know there is a specific ratio, but i'm too lazy to measure the water and plaster precisely, and this process is pretty old-hat now so I go mostly on feel.
 I slowly add the plaster to the water until the cup is nearly full, usually only a 1/2 inch from the rim, and the plaster no longer absorbs into the water.
 Here's the final product, after some vigorous stirring with a spoon, plus a little plaster on my hands.
 The plaster mixture should be thick enough that it has the consistency of a thin milkshake.
 Now it's time to pour. Some people spoon the mixture into the molds, but again, LAZY, I just pour the plaster directly from the cup. A little bit of splashing, but not bad. As you can see, on the right, the first mold is poured, and bubbles are starting to form on top, when trapped air has risen to the surface.
 Nearly done the pour on the second mold.
 And here are the first set of six molds, poured. The next step is vibrating the molds, so that any unreleased air bubbles can be released. I'll try to get to the next steps in a day or so.
Sunday, July 17, 2011
Canadiana: Triumph
Lay it On the Line
Tears In The rain
Just One Night
Somebodys Out there
Follow Your Heart
Tears In The rain
Just One Night
Somebodys Out there
Follow Your Heart
Hirst Arts: Three Dimensional Dungeons
I've been spending much of my time, lately, casting Hirst Arts blocks.
Hirst Arts is an web-based company that offers a line of rubber molds. Those molds produce plaster-of-paris blocks that can be used to build castles, dungeons, buildings and table-top gaming terrain elements.
From the 20 Hirst Arts molds that I currently possess, I am creating a set of three-dimensional dungeon tiles, complete with walls and dungeon dressing, to add some visual interest to our dungeon-delving sessions. Thus far, I have produced nine different kinds of dungeon floor tiles.
Each dungeon tile shown below is 3" x 3", comprising a 10' x 10' section, so that the tiles can fit together to make hallways and rooms. The walls will sit on the inside edges of the tiles, providing sufficient room in the middle of the tiles to have two 28mm miniatures walking abreast down a hallway.
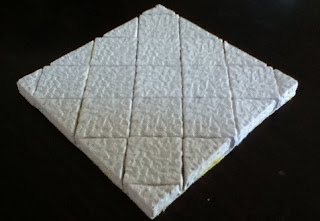
 The above picture shows my favorite set of tiles so far. Those dungeon tiles have a decorative edge running along the borders of the tiles. The edging appears to be made of runic script. I will use those tiles when the players find a section of dungeon that is more skillfully hewn from the surrounding rock, and the path of the runes will carry them to specific encounter or dungeon elements.
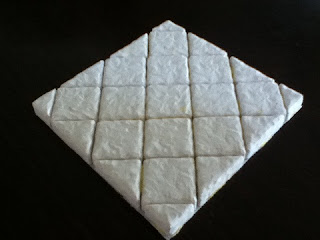
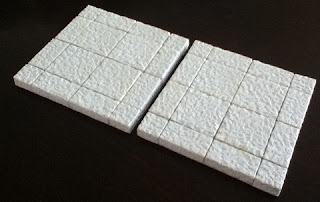 Most of the dungeon tiles will be comprised of these chipped stone numbers.
The benefit of this tile configuration (with the one-inch blocks in the center and smaller blocks around the edges) is that you can put the tiles together and the half- or quarter-blocks on the edges create full blocks when placed side-by-side. Those tiles can be used both for room and hallway tiles.
For a time, I agonized over the configuration of my dungeon tiles. Based on the design, the floor scale is 1" = 3 ft. 4 in. Compare that to 28mm figures, which translate to a vertical scale of 1" = 5 ft. Ultimately, the convenience of laying out connectible dungeon tiles (with the walls internal to each tile) won out over my need to keep the horizontal and vertical scales congruent.
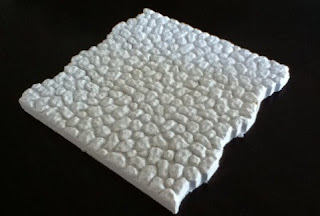 This 10' section of dungeon tile is for cobblestone floors. It has an irregular edge so that the seams between floor tiles are less obtrusive.
I envision using this style of dungeon tile for hallways such as the entrance to the Tomb Of Horrors. In the ToH, a path of differently-colored stones winds its way down a 20' wide hallway.
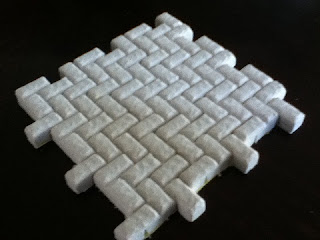 Here is a dungeon tile with a herringbone pattern. The tiles lock together. This particular set will take some time to produce, since there is only 1 of the 1" blocks on the Hirst Arts mold, so I need to cast that mold 9 times to create one 10' x 10' section.
 The same is true of the above tile. This decorative tile will be a good choice for royal chambers, temples and other lavish rooms.
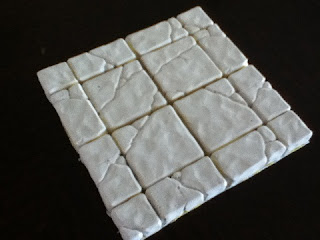
 The above dungeon tile has a neat octogonal pattern, however, the seams between the blocks is too pronounced. I'm still trying to find a way to fill those seams so that they don't distract from the tile pattern.
 Don't ask me to tile your home. As you can see, I didn't do a very good job of laying down these smaller blocks to create floor sections that have tiles set at a 45 degree angle to the direction of the hall or room.
The first of these two tiles is of chipped stone, the second in smooth tiles.
 This last dungeon tile is made up of cracked, smooth blocks. I prefer these less than the chipped stone blocks, since it's more difficult to give the final, painted version of these tiles visual interest.
My next task is to start working on the walls and dungeon dressing. Fortunately, I have well over 120 different elements to choose from, based on the Hirst Arts molds I already have access to. I will post some pictures of some of those other block elements so you can see the breadth of elements available in creating a three-dimensional dungeon environment.
Hirst Arts is an web-based company that offers a line of rubber molds. Those molds produce plaster-of-paris blocks that can be used to build castles, dungeons, buildings and table-top gaming terrain elements.
From the 20 Hirst Arts molds that I currently possess, I am creating a set of three-dimensional dungeon tiles, complete with walls and dungeon dressing, to add some visual interest to our dungeon-delving sessions. Thus far, I have produced nine different kinds of dungeon floor tiles.
Each dungeon tile shown below is 3" x 3", comprising a 10' x 10' section, so that the tiles can fit together to make hallways and rooms. The walls will sit on the inside edges of the tiles, providing sufficient room in the middle of the tiles to have two 28mm miniatures walking abreast down a hallway.
 The above picture shows my favorite set of tiles so far. Those dungeon tiles have a decorative edge running along the borders of the tiles. The edging appears to be made of runic script. I will use those tiles when the players find a section of dungeon that is more skillfully hewn from the surrounding rock, and the path of the runes will carry them to specific encounter or dungeon elements.
 Most of the dungeon tiles will be comprised of these chipped stone numbers.
The benefit of this tile configuration (with the one-inch blocks in the center and smaller blocks around the edges) is that you can put the tiles together and the half- or quarter-blocks on the edges create full blocks when placed side-by-side. Those tiles can be used both for room and hallway tiles.
For a time, I agonized over the configuration of my dungeon tiles. Based on the design, the floor scale is 1" = 3 ft. 4 in. Compare that to 28mm figures, which translate to a vertical scale of 1" = 5 ft. Ultimately, the convenience of laying out connectible dungeon tiles (with the walls internal to each tile) won out over my need to keep the horizontal and vertical scales congruent.
 This 10' section of dungeon tile is for cobblestone floors. It has an irregular edge so that the seams between floor tiles are less obtrusive.
I envision using this style of dungeon tile for hallways such as the entrance to the Tomb Of Horrors. In the ToH, a path of differently-colored stones winds its way down a 20' wide hallway.
 Here is a dungeon tile with a herringbone pattern. The tiles lock together. This particular set will take some time to produce, since there is only 1 of the 1" blocks on the Hirst Arts mold, so I need to cast that mold 9 times to create one 10' x 10' section.
 The same is true of the above tile. This decorative tile will be a good choice for royal chambers, temples and other lavish rooms.
 The above dungeon tile has a neat octogonal pattern, however, the seams between the blocks is too pronounced. I'm still trying to find a way to fill those seams so that they don't distract from the tile pattern.
 Don't ask me to tile your home. As you can see, I didn't do a very good job of laying down these smaller blocks to create floor sections that have tiles set at a 45 degree angle to the direction of the hall or room.
The first of these two tiles is of chipped stone, the second in smooth tiles.
 This last dungeon tile is made up of cracked, smooth blocks. I prefer these less than the chipped stone blocks, since it's more difficult to give the final, painted version of these tiles visual interest.
My next task is to start working on the walls and dungeon dressing. Fortunately, I have well over 120 different elements to choose from, based on the Hirst Arts molds I already have access to. I will post some pictures of some of those other block elements so you can see the breadth of elements available in creating a three-dimensional dungeon environment.
Tuesday, July 12, 2011
Salem's Lot: Horror Adventure Inspiration
 As a young lad, I watched "I, Claudius", Salem's Lot, and Night Stalker and found them equally terrifying. My older siblings stayed up late to watch I, Claudius and Night Stalker, and I would often sneak out of bed to watch those TV shows with them, despite being far too young for the adult content.
Several years later, the Salem's Lot mini-series was broadcast on television. Even though I was many years older, I found the final episode, featuring the grisly death of Dr. Norton, the vampire horde in the basement, and the reunion with Susan, quite frightening.
 All three of the above shows would make good fodder for horror-themed adventures, but I consider Salem's Lot to be particularly inspirational, since i've always wanted to DM a long-running, all-cleric, vampire-hunter themed horror campaign.
As far as role-playing adventures go, i'm not familiar with any really good horror adventures. That may simply be because my purchases have favoured traditional fantasy fare.
I'm tempted to buy Salem's Lot, and mine it for adventure ideas.
Sunday, July 10, 2011
Canadiana: Stampeders
For the next ten days we're celebrating the Calgary Stampede ... The Greatest Outdoor Show On Earth.
Due to OVERWHELMING demand, I give you The Stampeders, a Calgary band from the late 60's and early 70's.
One of the following clips is an actual performance at the Calgary Stampede, albeit 1971 or thereabouts.
Wishing you were all here, whooping it up with me! Banjos optional.
Due to OVERWHELMING demand, I give you The Stampeders, a Calgary band from the late 60's and early 70's.
One of the following clips is an actual performance at the Calgary Stampede, albeit 1971 or thereabouts.
Wishing you were all here, whooping it up with me! Banjos optional.
Canadiana: Three Days Grace
Three Days Grace - Pain (Official Music Video). Watch more top selected videos about: Three Days Grace
Saturday, July 9, 2011
Community: Modern Warfare
We, we turned on each other; like ... like ANIMALS! This is not over ... this is still happening, RIGHT NOW!
This has to stop!
Put me in the game...
If you liked the Fat Neil / Advanced Dungeons and Dragons episode, you must see the Modern Warfare episode of Community.
This has to stop!
Put me in the game...
If you liked the Fat Neil / Advanced Dungeons and Dragons episode, you must see the Modern Warfare episode of Community.
Canadiana: Kim Mitchell
Some pretty negative vibes these days in the blogosphere. I think eveyone needs to take Kim Mitchell's advice...might as well go for a soda!
Might as well go for a soda nobody hurts and nobody cries
Might as well go for a soda nobody drowns and nobody dies
Might as well go for a soda its better than slander better than lies
And once you've done that, make sure you do your rock n roll duty.
Remember, we're not in it for the money, we're in it for love love love...
Thursday, July 7, 2011
Traveller: Zhdits Destroyer Escort
 A failed experiment in screening Zhodani Destroyers from enemy fire, the Zhdits Destroyer Escort is nevertheless one of my favorite Traveller starship designs.
The thin neck and forward bridge, along with the winglike aft, gives the Zhdits a vaguely Klingon bird-of-prey or Romulan warbird vibe.
Since my early science fiction indoctrination was heavily informed by original Star Trek, the Zhodani initially became a convenient stand-in for the Klingons and Romulans.
 Once I put my hands on the full-sized Zhodani Traveller supplement, my view of the Zhodani became more nuanced.
 But I still think of Zhodani starships in Zhdits / Klingon / Romulan terms, and am slightly annoyed to see other, non-needle-shaped starship designs promulgated for the Zhodani.
Saturday, July 2, 2011
What We Did On Canada Day
Since I was Mr. Mom this weekend (my spouse is working on contract and has been away for the better part of the week) the kids and I went to Calaway Park for Canada Day.
Calaway Park is an amusement park roughly 10 miles west of Calgary (towards the Rocky Mountains).

Many summers ago, I worked at Calaway Park. One of the best jobs ever. There was a large contingent of 18-25 year olds, and after the park closed at 10 p.m., we were off to some bar, and on more than one occasion I got home just in time to change and race back to work for my 10 a.m. shift.
Ah, to be young and stupid. But I digress.
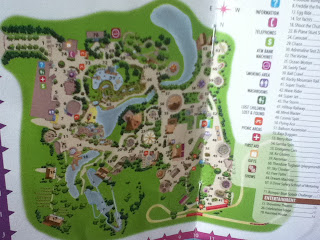
Calaway Park has grown substantially since I worked there back in 1985 (it now has 35 different rides). Here is a Park map.
My kids' favorite ride is the swings, called the Dream Machine. It was my six-year-old daughter's first time on the swings, and she wanted to keep riding it, but there were too many other rides, so we had to move on.
 My ten-year-old daughter loves the roller coaster, but do you think I can get her older brother to ride with her? We'll have to keep working him over!
 Here's a photo, from the top of a viewtower at the centre of the Park. This is looking towards the north. We bought season's passes to the Park, and the drive to the Park is only 15 minutes, since we live on the west side of Calgary. We normally get there at 10 am, when the Park opens, and leave at noon, since the Park gets really busy by early afternoon.

Calaway Park is an amusement park roughly 10 miles west of Calgary (towards the Rocky Mountains).

Many summers ago, I worked at Calaway Park. One of the best jobs ever. There was a large contingent of 18-25 year olds, and after the park closed at 10 p.m., we were off to some bar, and on more than one occasion I got home just in time to change and race back to work for my 10 a.m. shift.
Ah, to be young and stupid. But I digress.
Calaway Park has grown substantially since I worked there back in 1985 (it now has 35 different rides). Here is a Park map.

My kids' favorite ride is the swings, called the Dream Machine. It was my six-year-old daughter's first time on the swings, and she wanted to keep riding it, but there were too many other rides, so we had to move on.
 My ten-year-old daughter loves the roller coaster, but do you think I can get her older brother to ride with her? We'll have to keep working him over!
 Here's a photo, from the top of a viewtower at the centre of the Park. This is looking towards the north. We bought season's passes to the Park, and the drive to the Park is only 15 minutes, since we live on the west side of Calgary. We normally get there at 10 am, when the Park opens, and leave at noon, since the Park gets really busy by early afternoon.
Subscribe to:
Posts (Atom)